

Now that many DIY homeowners seek out projects to beautify the home it’s now time to maintain them. This includes the tiles that are set throughout the house, whether it’s in the bathroom, kitchen or the patio. Tiles will wear over time, something is bound to crack, shift or chip and then it’s time to get to work.
Replacing a single tile or a small area is not that difficult. Any novice DIY installer can easily fix this issue with a little time and effort. Understanding a few basic rules to these kinds of repairs will be helpful.
1—Isolate the damaged area or single tile. This is done by removing the grout from around the tile. Be sure to have a grout saw, this will lesson not just the time but also the possibility of damaging any surrounding tile. Often novice tilers try to hammer and chisel out the grout. Take heed and never do this as it will definitely damage the surrounding area in one way or the other. Simple shock waves from the chisel can damage the mortar, causing problems in the future. An alternative to using a grout saw would be to use a rotary tool, like a Dremel, to remove the grout with more ease. Take a look in for a San Diego Tile Outlet or any local outlet to find the proper tools needed for a project as this.
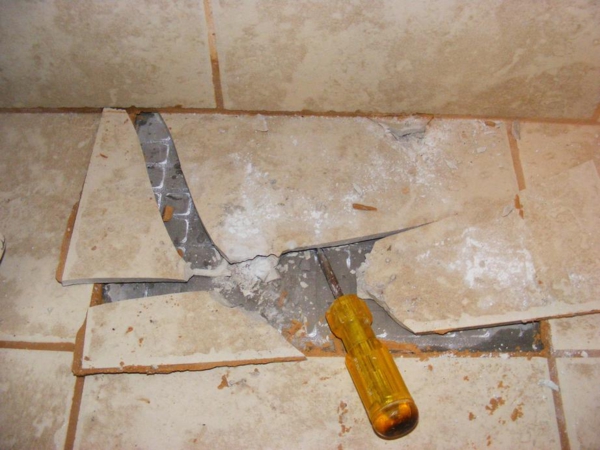
2—Once the grout has been removed it’s now time to break up the tile. Lay a cloth over the area. Use a small hammer and break the tile into smaller pieces. Remove the pieces to expose the bonding agent used. Be sure to wear gloves in this step if the pieces are sharp.
3—Step three involves removing the mortar or bonding agent which the tile was set in. It’s best to use a chisel to remove this but often it becomes a disaster when not paying full attention to the underlayment. If using the chisel with a hammer or forcing to hard the flooring under the bonding agent can be marred or damaged. This may not turn out to be a problem at the time but over years this could be an issue if moisture should enter the area.
4—When fully removing the mortared area be sure to vacuum, even if a small single tile. If the bed of the new tile has any debris or dust, dirt etc. this will cause a problem with the bonding agent. Be sure the area is completely cleaned.
5—Using the mortar best suited for the tiles being replaced, butter the back of the tiles. This is best performed with a small putty knife. Spread the bonding agent evenly across the back of the tile. Often DIY tilers use the ‘dotted corners’ effect. Never use this in any tile projects as it will be a disastrous turn and most defiantly crack or chip a tile in the near future.
6—Set the tile into place. It’s best to use the handle of a hammer to do this but if possible have a rubber mallet on hand. Be sure the tile is level with the surrounding ones, doing so will remove the possibility of lipping or any other noted sinking or raised tile problems.
7—Be sure to let the tile set at least 24 hours as the bonding agent dries. Read the instructions for setting the mortar chosen, this often helps to determine how long to wait.
8—Next, apply the grout. It’s easiest if a grout float is purchased. Be sure to move the grout from tip to tip in a sweeping motion. Once the grout is filled use a damp sponge or cloth to remove any excess from the surface. Again, read the instructions for letting the grout set. This can take a normal span of 72 hours or less. When the grout dries be prepared to remove the haze often associated with this kind of project. Grout haze can be removed by buffing the area with a dry cloth. Others choose to use cleaners available in any outlet or while look in for a San Diego Tile Outlet in the local area.
These simple but realistic steps can help any homeowner repair and replace tile. Doing this as a DIY project will help with the expense of hiring a professional to do a simplistic job. This article covers the basics of tile repair but sets a precedence for why homeowners should buy overage amounts of tile during the initial project. This will allow for any replacement without looking to see if the tile is still in stock or if it possibly is discontinued.
Les Walker has managed to repair hundreds of tiles in the last few years, saving loads of money along the way.