

Of all the possible 4×4 accessories, a UHF radio is one of the best. However, putting one in your truck can be a challenge. Here’s a guide to installing a roof console in your truck to hold your radio and some extra storage space.
The fact is that while many people like the idea of a UHF radio, most trucks don’t have enough room for one, much less storage space for maps and other items. By putting the UHF radio onto a roof console, it’s also in a handy spot and less likely to be seen and possibly stolen as a result. A UHF radio console can be expensive, however. This guide is focused on making DIY installation a breeze for those who want to avoid spending too much money. With some power tools and time, you can accomplish this for less than $100.
Supplies List:
- 2400x1200x9mm plywood
- PVA wood glue
- pack of assorted wood screws
- pack of staples
- roll of solder
- 4mmx4mm twin-core wire
- 2m of adhesive felt
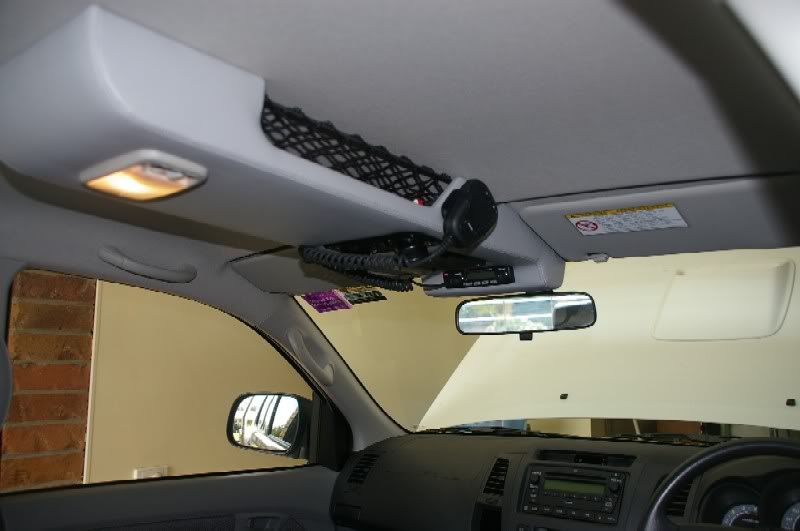
1. Before you get started, first take out the rear-view mirror and interior light as their positions will let us mount the console.
2. Measure how far the mounting parts are from each other. Keep in mind that you’ll need to include about 50mm for the console’s total length, which will be about 800mm.
3. On paper, draw the basic shape for the console you have in mind and mark the measurements. Next, you’ll need to measure the distance between your sun visors as this will be the greatest width possible for your console.
4. Cut two wooden square mounting plates. To calculate the size you need, subtract the thickness of the wood from the console’s width. For example, if the console width were 240mm, and the wood plates were each 9mm thick, you would have a final console width of 222mm. After you’ve cut the mounting plates, mark the center of the plates and use the rear-view mirror backing to mark the holes you need to drill. These holes will provide the front holes for mounting.
5. In the back of the console mounting area, mark the center of the mounting plate and use the inside mirror to mark the holes to drill. In the middle, drill a bigger hole so you can wire the interior light and the plug. Different drill bits will be required depending on the sizes of holes you’re working with. As you drill the holes in your wood mounting plates, go half way though, then drill from the other side to meet in the middle. This way, you can prevent splintering, which would be more likely to happen if you were to simply drill from one side.
6. While holding a side plate in place, measure the gap behind the front windshield. To figure the slope that needs to be cut off, mark the distance of the highest point from the front. Next, remove the piece and cut it along the line you drew to let it match the shape of the roof lining.
7. Take your original design and cut the lower ends of the sides of the console. Be sure to leave room for when you mount the UHF radio. Finally, use a jig saw to cut out the rest of the shape.
8. Keep checking the console’s fit against the roof as you work so you can make changes as necessary.
9. After the shape looks good, clamp it down and cut the next piece using the jigsaw.
10. Cut a sheet of plywood to the width of your mounting plates.
11. Screw the base plates to the side plates as you work.
12. Plane any joints that have gaps.
13. Cut a hole for the interior light using the jig saw, making room for the plug.
14. Clamp down the console and mark the storage opening. Drill a starting point, cut the space using the jig saw, then repeat on the other side and for the radio.
15. When the shape is optimal, unscrew the pieces one by one and glue them together with PVA wood glue.
16. Cover the wood with adhesive felt.
17. Paint the mounting plates black and screw them into place.
18. Run all the wires up the side piller, behind the roof lining and into the spot where you’re mounting the radio. Cut a hole in the lining with a utility knife, then feed the wires through.
19. Plug in the interior light and radio, then use 30mm wood screws to mount the console.
20. Project done!