

DIY tilers love to tackle home improvement jobs around the house. Many are weekend warriors looking to start and finish the job within a given time frame. Take time to investigate what the job requires. Without properly investigating a project from beginning to end it’s the first wrong step which homeowners make. If all else fails take the time to sign up for a do it yourself project course. These courses are often available through large boxed construction stores but many smaller tile outlets do the same.
Tiling up a wall is a project which many DIY tilers hate. This is where bonding agents, being exact with straight tiles and being precise determine the outcome of this job. If something slightly goes wrong it’s easy to see the mistake as wall tiles are viewable ‘right before your eyes’.
The first step to starting a wall project is to prepare the room. Often a total tear out of the room is necessary with every job. If installing tiles on a pre-existing wall preparing them is crucial. Remove all old wallpaper, glue, bonding agents, base trim (this is important) and anything which will directly affect the mounting of the tiles. Even items like wax and tar needs to be removed.
After preparing walls everyone should be sure that they are level with no dips or uneven areas. This can often be performed with self-leveling thinset but on this area it can be tricky to perform and achieve a professional outcome. This is often why so many choose to remove all walls and flooring and start anew. This leaves out many possibilities with problems that pop up from installing tiles. To learn more about this and numerous other aspects of preparation of a room, take a look in for a Denver Tile Outlet or any local outlet in the area.
An important second step with walls is to be sure to find the center of the wall. This will be the beginning point of mounting the tiles. Another important step before starting is to be sure the first rows of tiles are completely straight. Often it’s best to create a batten or shelf at two tiles higher than the bottom tile line. This allows for the bottom row and trim to be applied later without applying force onto that particular row. Measure twice for this batten row, if the line is off it will envelope up the wall causing the whole wall to be out of line. To make this part perfect install a line of tiles across the batten and let set for 24 hours.
Step three is setting of the tiles. This is a good thought to many who are using ceramic or other tiles which are not consistent in color. This happens often and the easy solution is to mix and match tiles from different containers or boxes. If tiling a ceiling it’s important to do this in steps, ceilings before walls, walls before floors.
To choose mortar and adhesives is important to which room and which part of the room you are using it in. Often thinset mortar is used but check what kind is best for the project which is about to be taken on. After finding what kind to use be sure to find the correct trowel that best for the job. This can be determined by reading the bonding agents instructions or taking a look in for a Denver Tile Outlet to request help with this important matter. Using the wrong trowel will create issues with too much or not enough bonding agent.
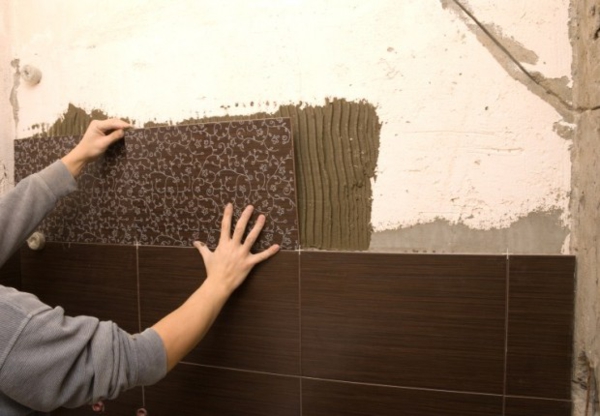
With the tiles and spacer it’s time to install the tiles. Be sure to start in the center of the wall and work out. This will keep the side tiles even to the view. If the outer rim of tiles is 1/2” inch or less then adjust the center to bring the line of tiles to one end, preferably an offset wall. This will allow for a single row of cut tiles down one side of the wall. After installation with spacers one must let dry for at least 24 to 48 hours.
Remove the spacers and apply the grout. Once installed it should be left to dry a good 2 weeks before applying the sealer. Keep in mind that any grout line which measure less than 1/8” requires unsanded. Anything above 1/8” needs sanded. Unless installing white tiles a colored grout will be a good idea in achieving a professional outcome.
Graham Pally has spent several months tiling his walls and spent many months correcting his errors too.